Last updated: 14 March 2010
|
Last updated: 14 March 2010 |
There are many published methods by which extremely accurate celestial alignment can be attained for Polar mounted (not Alt-Azimuth mounted) telescopes. It is my feeling that the reason that MOST ETX and LX users do NOT use Polar mode is because what is perceived to be a time-consuming and many times frustrating alignment procedure.
However, using "Clay's Kochab Clock" you can achieve near-perfect celestial alignment of any fork-mounted telescope in a matter of minutes instead of the "hours" it takes when using the DRIFT METHOD. At my observatory, both permanent telescopes were aligned precisely using this method and will track dead-center all night long except for minor periodic error; even my portable ETX 125 - when aligned by the "Kochab Clock" method - will routinely track for up to four (4) hours without any perceptible deviation in Declination.
Many of you know me as dead-set IN FAVOR OF Polar mode tracking for four (4) main reasons:
1) sidereal tracking is much more precise, as it only requires ONE curved arc motion (right ascension) to compensate for the Earth's rotation;
2) for GO TO and rapid slews, the operation is much more precise if alignment is accurately achieved;
3) long-exposure photography (even piggyback) is better rendered in Polar mode; and,
4) I AM OLD AND SET IN MY WAYS and that's the way "real" telescopes are "supposed" to operate!
For your portable telescope to track like an "observatory instrument" all you need to know are your exact latitude from which you are observing and a few "sky basics" as I taught them to college classes in Field Astronomy.
Before we get started, a warning: the following procedure merely SEEMS like a lot of information and a LOT of time required; I guarantee you that READING this will take far longer in the ultimate end than actually becoming proficient at USING this technique to perfection. It's like the proverbial bicycle...you may have to fall off a couple of times and balancing may be something that just doesn't seem "natural," but suddenly - once you're up and running - you realize just how sensible and easy this procedure really is!!
---------------------------------
THE LOCATION OF CELESTIAL NORTH
Fortunately for those in the Northern Hemisphere there is a bright star very close to the point in the sky toward which the Earth's "axis of rotation" or POLE extends. This position is the NORTH CELESTIAL POLE (the "NCP") and is within only one (1) degree of the 2nd magnitude star "Polaris," the brightest star of the constellation Ursa Minor; it is the star marking the "end of the handle" of the little dipper.
Alkaid, the tail-star of the Big Dipper is in line (nearly) with Kochab and Polaris. It can help assure that its really Kochab that you are using. The Big Dipper is much easier to recognize than the little one. Now we need a finder 'scope with a degree radius circular reticule and mechanically rotatable cross-hairs. Then merely observe the angle to the horizon of Kochab, match it in the finder, then adjust azimuth and the wedge as needed.
Although it is very close to the true NCP, merely aiming a telescope's axis of rotation (the "right ascension," "Polar" or RA axis) precisely at Polaris is not adequate for high magnification tracking, even for short periods of time. Rather, the mounting must be offset almost a FULL DEGREE - about 45 arc minutes (45') - FROM Polaris to actually be aligned to the NCP.
For a reference, note that there are 60' arc in one degree....the full moon presents a disk that is approximately one-half degree or 30' arc.
So, using the moon as a reference - and the fact that nearly TWO lunar disks fill the space between Polaris and the true NCP - you can quickly realize that "Polaris-close" is simply NOT close enough! but WHICH DIRECTION do you offset? And once you know the direction, how do you determine HOW MUCH the Polar axis must be offset? Is it necessary to merely "guess" at how far 1 degree really is?
Here are two quick answers.....we'll get down to putting these answers into action later in this guide.
DIRECTION? True Celestial North is found by drawing an imaginary line FROM POLARIS to the second-brightest star in Ursa Minor, KOCHAB. The NCP is located 45' arc FROM POLARIS TO KOCHAB along that line. Kochab is shown in Figure 1 and in Figure 1A through 1D, and comprises the "top outer" point of the "bowl" of the little dipper ladle as shown. Both Polaris and Kochab are about the same brightness, so the two stars are unmistakable.
HOW MUCH? You will see that, thankfully, we don't have to guess at our distance of about 1 degree. Without the moon up there to compare with, how do we decide how much to offset our Polar axis (RA) once we have "imagined" our line from Polaris to Kochab? If we simply had "two full moons" side-by-side up there next to Polaris it would be a piece of cake and easily close enough for very accurate tracking! There are many finderscopes on the market today that contain reticle eyepieces (some illuminated) that clearly mark the distance for THAT FINDER that the entire telescope (optical tube assembly and mount together) must be moved away from Polaris to zero in on the NCP. However, most of today's modern GO TO computerized telescopes do NOT have such finders since most manufacturers suspect (unfortunately) that the user will be opting for the more convenient and easier "Alt-Azimuth" mode which does not require precise identification of the NCP. Nonetheless, you will see how easy it is to use your own finderscope - no matter what size nor type it may be - to quickly acquire the NCP. You need only to "get friendly with it" to understand the orientation of north, south, east and west and to know how much sky you are covering when viewing through it!
But first things first: It's time you learned "Clay's Kochab Clock" and its convenience and speed in providing you with precise polar alignment every time....on time!
----------------------------------
"CLAY'S KOCHAB CLOCK"
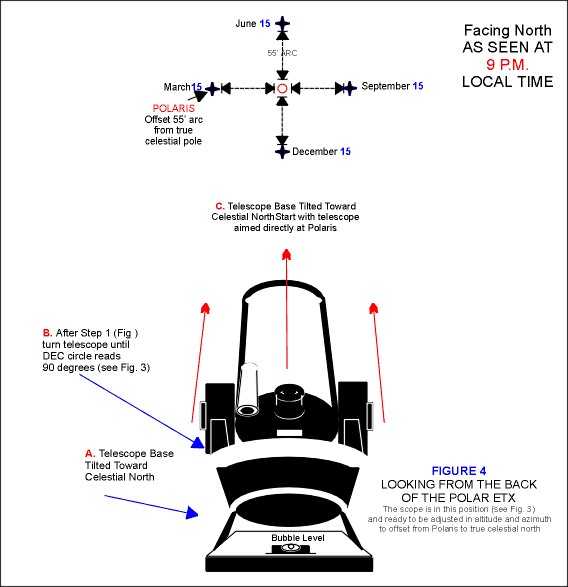
Figure 1 demonstrates four major times of the year which I call the "Cardinal Points" of the celestial pole. These occur roughly at about 9 p.m. local time on: MARCH 15, JUNE 15, SEPTEMBER 15 and DECEMBER 15. Looking at the drawing of Ursa Minor and its stars Polaris and Kochab in relation to the NCP reveal why these dates are so very important for "getting a handle on" Polar alignment. These four "points" are the basis to understanding Clay's Kochab Clock because you are dealing with the NCP only in terms of either "up from...", "down from....", "left of....", or "right of....." Polaris at these exact dates at 9 p.m.!
Once you have learned the locations and times of year/night of these cardinal points in relation to the NCP, you will be able to quickly extrapolate the NCP from any given position of Polaris and Kochab on any given date or time to within very precise accuracy for most portable observing situations.
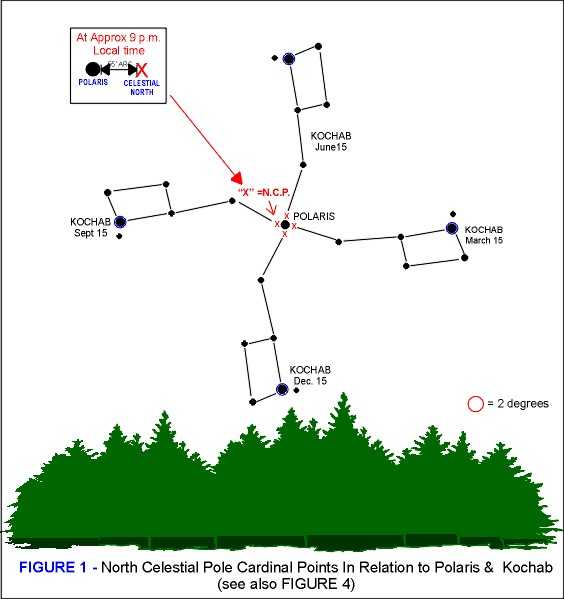
Consider the positions at about 9 p.m. of the three features shown (Polaris, Kochab and the true NCP) in this drawing:
MARCH 15 (spring) - the NCP is due "RIGHT OF...." (or EAST) Polaris toward Kochab;
JUNE 15 (summer) - the NCP is straight "UP FROM...." (or actually SOUTH in the sky) Polaris toward Kochab;
SEPTEMBER 15 (autumn) - the NCP is due "LEFT OF...." (or WEST) Polaris toward Kochab; and
DECEMBER 15 (winter) - the NCP is straight "DOWN FROM...." (or NORTH in the sky) Polaris toward Kochab.
So let's look at one best-case scenario to get familiar with how all this works. Let's say that you want to go out into the dark woods to observer with your telescope on June 15 or thereabouts. In theory, you can quickly se that if you "aimed" your fork-mounted telescope RIGHT AT POLARIS and then - at about 9 p.m. -simply moved the entire scope, mount and all STRAIGHT UP by about one (1) degree and locked it into place, you'd be as close to true celestial north as expected of even observatory telescopes! It really IS that simple....like riding the bicycle after many failed attempts.
Another "best case" scenario falls on September 15, where - after centering Polaris "up and down" in the telescope and clamping the elevation at that position as it is aimed due north - you merely have to move the assembly "TO THE LEFT..." one (1) degree (west) and you are aimed right at the celestial pole! The same simplicity applies to December 15 and March 15 as well....now examine Figures 1A and 1D and determine mentally what direction you must move the telescope assembly to hone in on the NCP for those two dates.
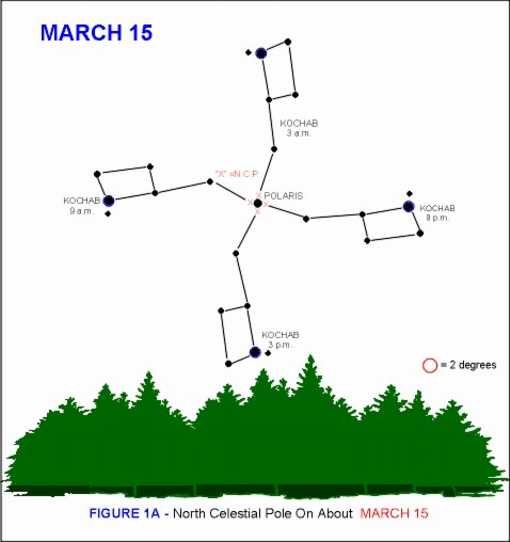
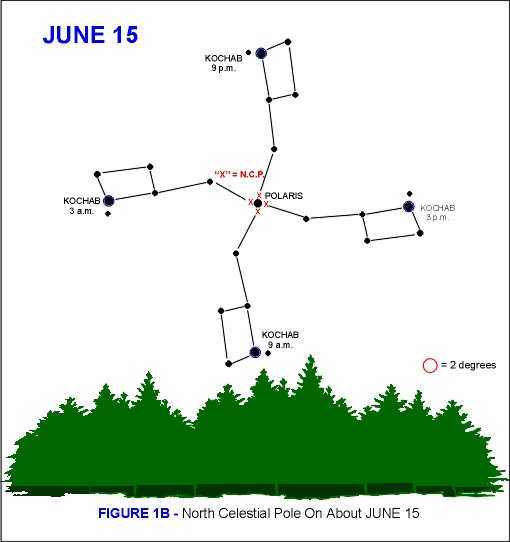
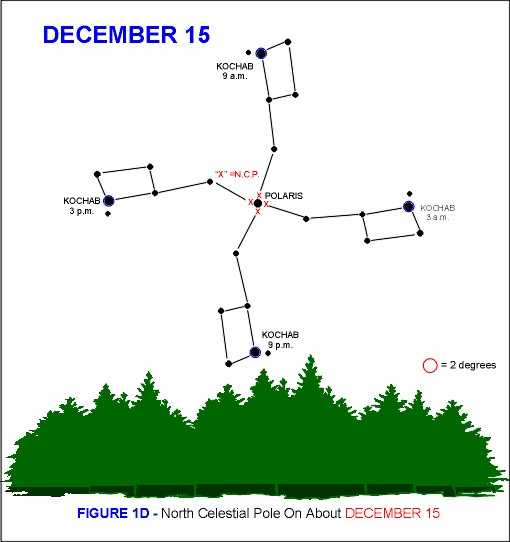
....but those are not the only times we want to observe, right? What about all those days in between? And what if you wish to align, say at midnight and not 9 p.m.? You can STILL use the "Celestial Pole Cardinal Points" (up, down, right, left) throughout any given day of the year and any time of night knowing the REVOLUTION of the constellation Ursa Minor around the celestial pole through the course of one NIGHT. Since it is "circumpolar," or never rising nor setting below the horizon for mid-northern and above latitudes, you can use Ursa Minor's stars the "Kochab Clock" as shown in Figures 1A (an example for March), 1B (an example for June), 1C (an example for September) and 1D (for December) which clearly demonstrate that your offset can be determined through the course of any particular evening as the Earth turns and makes Ursa Minor appear to revolve around celestial north.
Remember, there is nothing complicated about this, even if you wish to align on some date outside of these "cardinal points." Such times will merely be COMBINATIONS of the one-degree offset in "up-down" and "right-left" movements. The distance will ALWAYS be one degree.

IMPORTANT: Although I have provided some quick references for the four cardinal dates in Figures 1A through 1D, a better reference to determine the position of Ursa Minor and Kochab would be through one of the many wonderful "planispheres" or "star dials" that are commercially available at bookstores or through mail-order or e-mail astronomy shops. With these, you merely "dial up" the date and time that you observe, normally hold the planisphere over your head aligned to north and determine the position of Kochab for ANY night and time of the year!
There are two ways to utilize the charts in Figures 1A, !B, 1C and 1D (or better still, the "planispheres" mentioned above). First, you can extrapolate for the positions of Ursa Minor (and thus Kochab, Polaris and the NCP) for months between the "Cardinal Points;" in other words, using the Figure 1A (March 15) and Figure 1B (June 15) you can see that Kochab will be located midway between the two 9 p.m. sky positions about 45 days from March 15 (or, halfway to June 15) which would put you about on May 1. Second, you can use these charts to extrapolate the position during EACH NIGHT; for example, in December we see the position for Kochab at 9 p.m. and again still in darkness at 3 a.m.. If you are wishing to observe about MIDNIGHT, the star will have revolved about halfway from the 9:00 position to the 3:00 a.m. position, and that 45 degree angle can be used as your reference to the position of the NCP.
Ideally, you want Kochab positioned in one of the Cardinal Points (straight up, down, right or left from the celestial pole) as closely as possible; an hour or so on either side of the times given will get you VERY close to true NCP using these stars. The reason is quite simple: all it takes to acquire true north is ONE adjustment either in altitude or azimuth and no guessing in between. As a quick and easy example, look at the chart for March (Figure 1A). If you are setting up your telescope at or around 9 p.m., you merely must move the assembly to point EAST of Polaris by about one degree since Kochab is due east at that time; the NEXT cardinal point for Kochab on the same night will be a 3 a.m., when the telescope mount must be moved UP from Polaris to similarly acquire NCP, again using only ONE adjustment direction to center.
----------------------------------
SETTING UP THE POLAR TELESCOPE TO USE THE "KOCHAB CLOCK"
A full discussion about your telescope's polar alignment and "home position" is found in the Enhancement Guide, Part 3. For use of the "Kochab Clock" for accurate and quick alignment, you merely must know the position of that star in relation to the time and date you are observing (from Figures 1 through 1D), your latitude of the observing site (to within 1/2 degree) and the FIELD OF VIEW (FOV) of your finderscope equipped on your telescope.
Let's go through a quick and easy "Kochab Clock" Polar alignment for the night of June 15.
1) Determine your observing site latitude (using USGS survey maps, a GPS device or any good map will provide the latitude to about 1/2 degree); remember, your declination setting circle WILL BE USED, but it is accurate ONLY to within about 1/2 degree for this purpose so any more refinement is overkill. At the same time, look up or determine (see below under "Using Your Finder....") the exact field of view of your finderscope.
2) Whatever base you are using (tripod head, flat plate of the wedge, pier or table top) make sure at this time that it is very level both north-south and east-west. NOW, make sure your finderscope is aligned to the main telescope optical path (you may use a terrestrial object to tweak the finder into position). IT IS VERY IMPORTANT that your crosshairs to the finder are IN LINE with both axes of the mounting, in other words, one crosshair running E-W and the other exactly N-S!
3) First orient your telescope as shown in FIGURE 3 (Polar Home Position) as this will allow you to roughly set the telescope and its mount (on a wedge or tripod) to the correct latitude of your observing site. With the telescope aimed "outward" (north) DIRECTLY IN LINE with the two fork arms as shown in Fig. 3, move ONLY the wedge/tripod or combination (DO NOT USE THE TELESCOPE BUTTONS OR CLAMPS....you must have the scope fixed as shown in Fig. 3!) to center the assembly toward POLARIS. This is merely to orient your equipment reckoned close to true north.
4) Once the main telescope is visually aimed fairly close to Polaris, tighten down all the wedge/tripod adjustments for now; unclamp bot axes and rotate the telescope in declination and RA to the position shown in Figure 2, with the optical tube assembly (OTA) pointing straight UP; the setting circle is shown on the "right" fork only for illustrative purposes (it will actually be on the opposite fork arm).
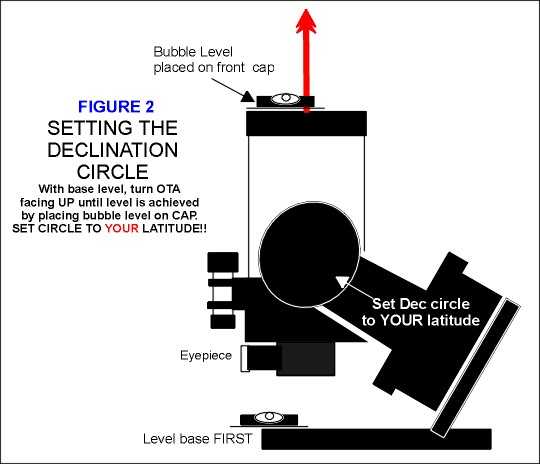
5) With the OTA roughly aimed upward, unlock the RA axis; using the FLAT SURFACES of the lower parts of each FORK ARM (they are very perpendicular to the OTA and can be used for this purpose) place a bubble level that can read perpendicular-level against the fork and rotate the forks in RA until they are straight-up-and-down as indicated by the level; this will assure that the two fork arms are parallel to the ground.
6) Clamp the RA axis again and - WITH THE LENS CAP ON THE OTA - unclamp the Declination axis once more and place the bubble level as shown in Figure 2 across the NORTH-SOUTH direction of the lens cap which provides a nice flat and true surface. Rotate the OTA back and forth slowly in Declination ONLY until level is achieved here and then lock firmly down.
7) When the end of the OTA is level (assuming that your BASE [ the wedge or tripod head ] is also level) then your telescope will be pointing ASTRONOMICALLY AT THE ZENITH, or perfectly straight up. This angle at which the telescope is pointing in Figure 2 is ALSO the angle of your exact latitude of the observing site! Thus, check the declination setting circle; if it DOES NOT READ exactly the latitude that you pre-determined in Step 1) above, then loosen and carefully adjust until it reads that latitude precisely.
8) All of this trouble so far is merely to get into "home position" and so that you can be assured that your Declination setting circle is reading PRECISE declination.....because you need it to for accurate polar alignment using the "Kochab Clock." Once set, very slowly as to not upset the circle adjustment, unclamp and move the OTA in Declination only toward due north until the setting circle reads "90" degrees. Refer to Figure 3 to see this configuration [NOTE: it is highly unlikely at this point that Polaris will be in the field of view of your main telescope, but most likely WILL be seen somewhere in the finderscope.]
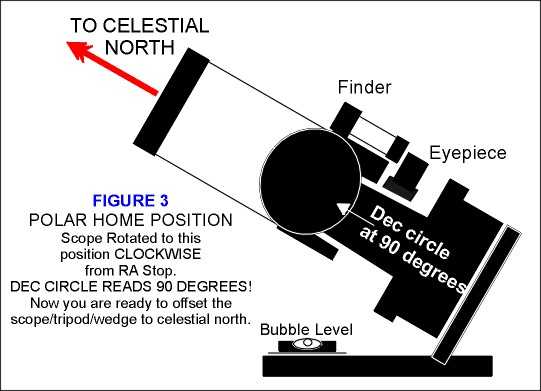
9) Once there, make sure the telescope's RA and DEC clamps are firmly engaged and NOW MOVE ONLY the wedge/tripod adjustments... NOT the telescope control keys or clamps....and center Polaris in the field of view of the finderscope only, making sure that your finder is adjusted to sight exactly with your telescope. (see Figure 4 for details). Do NOT lock down the adjustment clamps for the wedge, tripod or base at this point....you will need to keep them loose to offset the assembly to true N.C.P.
10) Your telescope OTA and the fork mounting are now optically and mechanically aligned and ready for locking onto true Celestial North using the "Kochab Clock" offsets as previously discussed. If you have extrapolated correctly the exact position (up, down, right, left or ANY COMBINATION of two of these directions of offset) then you merely will move the telescope in that specified direction; perhaps you will be lucky enough to be observing on one of those nights or one of those times that fall precisely on one of the "Cardinal Points" for the NCP.
To this point, we have identified how easy it is to reckon what DIRECTION to move the assembly toward the NCP, but now we must determine HOW much. Fortunately, the amount of offset from Polaris toward the NCP never changes...it will always be about 45' arc.
IMPORTANT TIP - HERE IS THE KEY: If you can find a time when Kochab, Polaris and the NCP will be at any of the "Cardinal Points" all the easier. REMEMBER, in this example it is at 9 p.m. on June 15, so you first simply CENTER POLARIS in the crosshair and lock down your azimuth adjustment. At the right time, when Kochab is DIRECTLY UP (see Figure 1B), then simply RAISE the elevation (altitude) of your wedge or tripod by about 1 degree....it is the ONLY motion you need to make for alignment! If using the right angle finder to acquire the NCP, then Polaris would be seen to drop DOWN as you raise the elevation of the scope assembly.
On the other hand, if observing on September 15 at 9 p.m. or thereabouts (Figure 1C) you can see that you would CENTER POLARIS in elevation (altitude) and lock THAT adjustment down and - again as soon as Kochab is seen (Fig. 1C) just LEFT of Polaris and the NCP, merely PUSH the mounting assembly to the LEFT one degree to acquire exact NCP accuracy. If using the right angle finder (like supplied on my ETX 125) this would make Polaris appear to shift to the LEFT in the field of view .
----------------------------------
USING YOUR FINDER TO OFFSET TO THE N.C.P.
Before discussing the distance needed to offset Polaris so toward the NCP, BE SURE to understand "sky directions" in your finder. The following orientations will apply to all finders for our automated telescopes, no matter what size nor brand:
1) straight-through finders - SOUTH at top; NORTH at bottom; EAST to the left; WEST to right.
2) right-angle finders - NORTH at top; SOUTH at bottom; EAST to right; WEST to left.
This is important to know when viewing through the finder and knowing the direction in which the NCP is OFFSET from Polaris toward Kochab (see Figure 4 for apparent actual SKY DIRECTIONS for the NCP relative to Polaris at seasonal times of the year)!
FINDER FIELDS OF VIEW: Since many finderscopes may be used with our GO TO telescopes, I have provided values that give a "close" angular field of view for the common finders that will be utilized. Note that, even from finder-to-finder of the same brand and size, there are variations but these numbers are close enough to provide angular measurements accurate for polar alignment. For each of the finders, note that I have subdivided the finder's field into 1/2 and 1/4 increments; see Figure 5 for an illustration showing these increments.
FINDER: 8 x 21 straight-through.....FIELD: 6.8 degrees / = 3.4 degrees for 1/2 / = 102' arc for 1/4 field;
FINDER: 8 x 21 right-angle.............FIELD: 6.4 degrees / = 3.2 degrees for 1/2 / = 96' arc for 1/4 field;
FINDER: 6 x 30 straight-through.....FIELD: 5.2 degrees / = 2.6 degrees for 1/2 / = 78' arc for 1/4 field;
FINDER: 8 X 50 straight-through.....FIELD: 4.8 degrees / = 2.4 degrees for 1/2 / = 72' arc for 1/4 field.
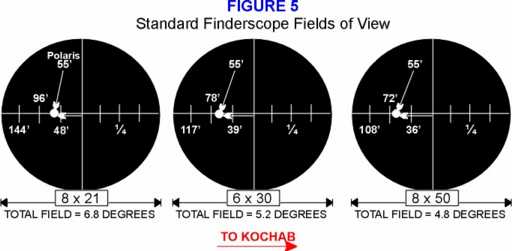
In Figure 5, we are not really concerned with "direction" and thus it does not matter whether this is a straight-through or right angle finder, but only the size or FIELD the finder might show; this is to demonstrate how to SUBDIVIDE your finder to determine the correct distance to move along any one (or combination of two if not offsetting to "Cardinal Points") crosshair to the proper angular distance from Polaris.
Note that a 1/4 field for ALL finders in Figure 5 is too great an offset for the NCP from Polaris; rather, determining where slightly more than 1/8th the field of most finders would give us a very close approximation of the needed 45' arc spacing. REMEMBER: In Figure 5, the "direction" of offset shown is for EXAMPLE ONLY. This merely shows how far to move Polaris off of center. Each arrow points to the position relative to center that Polaris would need to be moved in each finder to PUT THE NCP IN THE CENTER of the finder (the offset of course MIGHT need to be up or down, or to the right, rather than to the "left" as shown).
The 1/8th increment is EASIER to visualize that it might at first seem. Since you have a "crosshair" the field of the finder is actually already divided into two halves. So 1/8 the TOTAL field of your finder is merely a fourth the distance from the center of the crosshairs to any edge! We can "think and visualize" in quarter increments a LOT better than in 1/8ths!
The two 8 x 21 finders are ideal for just this measurement, meaning that YOUR offset in such a finder would be slightly more than ONE-QUARTER of the way FROM Polaris (now centered in the eyepiece) toward the edge of the finder field that you have determined is the proper direction to move (Figure 4).
Remember at this point that the field orientations (N.S,E,W) are different as described above for right angle and straight finders; the best thing to do is to determine for yourself by nudging the end of the telescope OTA in a certain direction and watching the motion of stars in the finder as you do. THAT is the only way to be certain you are offsetting properly. Just remember where KOCHAB is....THAT is the direction you want to move the assembly by just about one (1) degree, that imaginary line running from Polaris, across the NCP through Kochab.
--------------------------------
A TESTIMONIAL ABOUT ACCURACY
This final thought about using the apparent motions of Ursa Minor and the "Kochab Clock" method:
Just last week I finished installing a permanent observing station behind my home in Conway, extending my veranda to the south of the house and putting in an enclosed deck and support for my custom pier. As soon as the last board was attached I set about to permanently align my pier so that I could merely take my ETX 125 in and our of the house each night, drop into the slot on the wedge, secure it and be observing without any further alignment.
So....as I have done so many times with permanently mounted telescopes....I began working on the adjustments to the wedge and pier through the ever-popular "drift method," which has taken as much as a WEEK to accomplish to my satisfaction in the past.
The irony of this choice of celestial alignment was that - as I was building the deck - I continued to observe nightly since late January from the same pier which I had aligned using my "Kochab Clock." I aligned this way as soon as the concrete pedestal cured, when Kochab was DUE EAST of Polaris about 11:30 p.m. one evening (one of my "best-case scenarios"). I merely waited until Kochab was EXACTLY to the "right" of Polaris, and - with Polaris first centered in the crosshairs and locked tight in elevation - I simply pushed the ETX wedge at the right time exactly 1/4 of the way FROM CENTER to toward the RIGHT (see Figure 1 and Figure 1A). This allowed Polaris to "scoot along" the E-W crosshair until I decided I had moved it just the 1/4 distance necessary (with the right-angle 8 x 21 finder Polaris appears to move to the RIGHT) when pushing the wedge and scope to the RIGHT).
So....for well over a MONTH, I have had perfect GO TO's, perfect slews, 4-hour tracking on Saturn with no correction, all from a celestial alignment that took less than 10 minutes using "Clay's Kochab Clock" method. It was better performance than my observatory-mounted equipment that I had laboriously aligned using the "drift method."
THEN, last week I decided to re-align using the "drift method" and NOTHING WORKED RIGHT. My GO TO's were marginal at best, I had declination drift....and on and on. I was so unhappy that I immediately "undid" my tedious three-day drift alignment and went back to "Kochab's Clock" on March 7 when the moon was near-full. At about 9:30 p.m. Kochab was once again immediately RIGHT of Polaris (after I had adjusted the altitude to put Polaris in the center) so it was in "perfect" position. I moved toward it and locked down in about 15 seconds, tops, and did a test GO TO at 146x on the star Castor.
Dead center. Then I went all the way across the sky to Capella at the same magnification....dead center. Later, about 11:30 p.m. I put the scope on Regulus and did a trial run on tracking at 410X. The results? At 3:47 a.m. sharp the next morning I shut down the power to the telescope to bring it in.....
Regulus was still shining a brilliant yellow far to the west of where it had started.....DEAD CENTER.
P. Clay Sherrod
Arkansas Sky Observatory
Conway / Petit Jean Mountain
Arkansas
Return to the top of this page.
Go back to the Observational Guides & References page.
Go back to my ETX Home Page.